Aug 18, 2013

DONE: 1:8 SCT Shock Standoff Hubs Upgraded and Window Removal

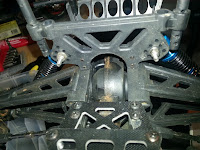
Completed the shock standoffs and hubs upgrade replacement on my Team Associated 1:8 SCT using Factory Team parts.
I removed the original plastic parts in prep for the upgrade to Blue Aluminum parts.  These plastic parts tend to be the "weak point" on the shock assembly in a crash or hard landing.
I keep all the parts in a box and labeled until all the postal shipments arrive since I ordered from a variety of vendors.  The install went very smooth, just have to remember there are several small parts required.
I changed the original orientation of the rear shocks to the higher mount-point to changed the down-angle to the wheel-support, providing slightly more down force on the wheels.
I recommend hand-tightening only for the 3mm hex nut with plastic lock liner.
When properly tightened, some of the bolt will show protruding from the hex locking nut.
During the upgrade on the rear shocks, I over-tightened and sheered the end of the bolt off. I had to order more as they come in a 4-pack only.
Using my Dremel tool and roughing sanding bit - I have started to remove the plastic "windows" from the truck. This provides for a more true prototype feel I think and well allow for better air flow overall.

Aug 4, 2013

REPAIR: Turnigy Trooper 1:10 4wd SCT Shock Assembly

One of the new replacement shocks for my Turnigy Trooper that I completed back in early July broke.  My daughter was on the throttle wide open and hit a fence at the ball field and the front right shock assembly broke off at the top mounting point.  This is mainly due to the fact that these are plastic ball cap mounting type shocks (not ideal of course, but affordable compared to all Aluminum shocks--about 3x the cost).
First, I opened the new shocks and ensured the silicone damper oil was correctly filled, it wasn't but that is expected from Singapore parts.  So I filled with 40w Factory Team shock oil and bled out the air bubbles.  The actual mounting to the Turnigy Trooper's Shock Tower requires a plastic spacer sleeve that was also destroyed in the accident.  So I had to order a 2-pack of them from Turnigy in Singapore, which took about 2 and half weeks to arrive (.26 cent part!).  That again identifies the risk you assume when you order a budget RC model from an overseas manufacturer like Hobby King.  Hobby King advertises they have a US-based warehouse, but my experience says differently as everything I've ordered (even when selecting the US warehouse on their website) still ships from Singapore.
Here is the bag with the new Turnigy shock spacer sleeve part.  I've attached the new shock along the bottom at the wheel brace.  That is the .26 cent part in my hand.
Using the same new stainless steel hardware used previously, I am mounting the new replacement 85mm shock (purchased on eBay from the same RCBattery2011 seller as before).
Here the repair job is completed, at a total cost of about 5 dollars--so not bad at all for the first bashing accident!  And honestly this is to be expected with the RC vehicle hobby.
While I had the 1:10 Turnigy Trooper 4wd SCT on the workbench I decided to do a little PMCS work.  Here I apply a very light coat of Model Railroading Engine Hob-E Lube to the main gear spur and motor spur.  I then take a rag and hover over the spurs and apply full power to motor to spin-off any excess lube.
Previously I had attempted to water-proof the transmitter receiver within a small zip-lock bag.  I noticed after some running time that the bag had worked itself open.  So I used some Automotive Goop adhesive/sealant to seal the bag shut.  Will be simple enough later if I need to work on the transmitter to just cut the bag off the wires and replace the zip-lock baggy.

DONE: New Closed Wheel Hex Nuts for my 1:8 4wd SCT

I have added a new part I really like. I didn't like the open wheel hex nuts on my Team Associated 1:8 4wd SCT.  The open hex nuts are pretty standard OEM parts from all the RC makers, but these type of nuts allow dirt and debris to build up inside the wheel assembly.  I was constantly cleaning the caked dirt and sand out.  Not to mention it did look very replica-like from the full-sized prototype LOORS SCTs.
The comparisons here show the difference---the open versus the closed style.  I really like the new look and they will prevent dirt build up now.  These are Fine Thread 17mm Hex Closed Wheel Nuts by King Headz.  And are very affordable
Looks great with the replica Method racing rims!

Jul 8, 2013

DONE: Turnigy Trooper 4wd 1:10 SCT Shock Replacement!

I've completed my shock replacement project for the wallet-friendly Turnigy Trooper 4wd 1:10 SCT by HobbyKing.  As I stated in my review earlier, this is a very good budget RC truck with only one flaw out of the box I could find: Bad Shocks.  A quick Google search of Turnigy Trooper reveals this plagues many buyers of these new RC trucks (you'd think they would get the message!).
The shock on the left is Turnigy's stock shock after just one running, the caked on mud and dirt is a result of the leaked damper oil all over the outside (both rear ones looked the same) and the rear shocks provided no lift to the truck and the body actually sat on the rear tires during my out-of-the-box run.  On the right is the new shock--ordered from a eBay hobby store front out of China (around $20 for all 4 and came with no mounting hardware FYI).  These are brand new 85mm Aluminum-bodied with black metal coil over-springs and damper oil-filled shocks.  I used new stainless steel hardware to mount the new shocks and had to remove the ball-pivot mount from the wheel support frames from the stock shocks, as the new ones used a screw-through pivot mount method.
I very happy with the final outcome.  The new inexpensive shocks work nicely and a test drive afterwards showed a remarkable performance increase and now I am almost happy with my purchase of this budget RC truck (around $155, and is light years ahead in quality and performance of the ECX Torment 2wd 1:10 budget SCT I own).  However, it is sad I received no help from HobbyKing.com (other than a $10 credit for a future purchase) and they have lost my business for good.  I did however receive several nice messages on their forums by fellow Turnigy Trooper owners offering assistance.  Of course my only remaining complaint is this truck has no rear mudflaps, which really bugs me!  Interestingly enough the previous Turnigy Trooper did, I don't get it.  Hmmm, maybe that's my next project on this truck...

Jun 26, 2013

DONE: Team Associated SC8.2e Braces Upgrade!

I completed my SC8.2e 4wd 1:8 SCT upgrades last night. It now has lighter, stronger front and rear Chassis Bracers made of machined aluminum and I replaced the front Server and Steering Brace. Those are the blue colored parts in the pic.
Step 1 was seen in the post prior, where I removed the components being replaced. Here I am figuring out how to hold the white, threaded insert for the bottom of the braces in place...then it hits me, a small piece of tape on each side.  And it worked great.  Here is the rear Chassis Brace going into place.  I bought off of eBay an entire SC8.2e Stainless Steel replacement screw, bolt and nut set.
I need to buy a plastic container now for all the replacement kit's screws, bolts and nuts.  In the picture on the right I'm lining up the stock screws with the new ones to find matches.
Here is the work of replacing the front Servo and Steering Braces.  First, since there are no directions supplied or on the Team Associated website, I had to figure out the order of attaching the new aluminum parts.  With some trial and error, I figured it out finally.  I had to remove the drive axle plastic cover to make room for the new front Chassis Brace.
I used Loctite blue threadlocker on the new Servo and Steering Brace screws.  Caution is needed here to make sure all of the bearings for the steering mechanism are correctly installed and the hex nut and spring on the servo's steering control arm are good to go.
Here are pics of the front braces completed.  I like it!
Finding the correct alignment for the bottom part of the Chassis Braces is tricky, but I recommend on the rear brace you attach it first through the bottom, but for the front brace - connect it to the Servo & Steering Brace first then up through the bottom last.
A tricky spot during the install was the two wheel hex pins that connect the wheel assembly to the frame.  I connected the pin through the left and right side first, ensuring correct placement in the frame's rubber bushings and then rotated the new brace down and again ensured the rubber bushing in the Servo & Steering Brace aligned correctly.  Also the two front wheel drive 136mm dogbone connectors must be correct inserted (spin the tire if need be).  The left pic shows the new stainless hardware re-attaching the drive axle plastic cover back on.
All done!
My customized Makita/Rockstar #82 LOORRS body!
Testing the truck after the rain stopped, making sure I re-assembled everything correctly.  The truck ran great, especially with the new Protek RC 14.8v 4S 100C battery!